
Michael Theme Settings
Theme Settings Proper
Church Info
 The Church Info contains a lot of information that should not need to be changed often.
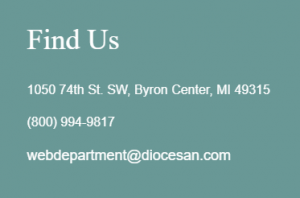
Address
This is required. The link text should be the address for your organization and the URL should go to the Google Maps share link and the box to Open in a new tab should be checked. Most likely, this will have been done already. This will be added on the left side of the footer.
Iframe
This will most likely be done already for you, but it is just the link for the Embed a Map on Google Maps. This is used for the Contact Us Template’s Map
Phone
Enter your organization’s phone number. Added under the Address in the Footer.
Mass Times & Schedule
Mass Times & Schedule Tab is there to have one spot to change the Mass Times that show up on the Mass Times template and on the Homepage Mass Times section (if the Show Section and at least one Show Time Toggles are on “Yes”)
- To create a new section click the Add Section button
- Enter Section Title (the big heading on the Mass Times page) such as “Weekend Masses”
- Then enter the Label, i.e., day of the Liturgy or service.
- Enter the Detail, i.e., Time of the Event.
- You can also choose to show that Section on the Homepage and then choose which Labels and Details to show on the Homepage too.
Note: The Section’s Show on Homepage needs to be on, as well as, any Label’s/Detail’s Toggles to show on the Homepage Banner. - Click the blue Update button in the top-right of the Theme Settings window to save your changes.
Office Hours
The Office Hours tab is shown on the Contact Page template
- The Label should be used for either the days or day range or possibly “Office closed”
- The Detail is usually used for the time range.
- To add more office hours, click the Add Row button and repeat these steps.
- You can rearrange the Office Hours by clicking on the number on the vertical gray bar next to the options and dragging it above or below the other hours.
- To remove an Office Hour, hover over the row you wish to delete, and click on the Minus symbol
 on the right side of the row and click Remove.
Staff
Image Style
- Simple will just add the ministry contacts in a list.
- Complex will lay them out in columns with images (their pictures if they are staff, if they are not staff then it will use the featured image for the ministry)
Image Alignment
This will affect the pictures in the Staff Module and the positioning of them. You can try top, center, or bottom to see what works best for your photos.
- Top – Will make sure the top of the photo is seen and may cut off the bottom
- Center – Will make the center of the image the focus and may cut off the top and bottom of the photo
- Bottom – Will make sure the bottom of the photo is seen and may cut off the top
Social Media
The social media will affect the icons that appear in the footer.
- Click the blue Add Link button
- Set the icon, you can type to search for an icon, e.g., Facebook
- Click the Select Link button.
- The URL is your social media URL, e.g., https://facebook.com/OrganizationName
- The Link Text will only appear when a user hovers over the icon for a period of time.
- Check the Open link in a new tab box.
- Click the Add Link button
- Repeat to add more Icons.
- You can rearrange the Social Media Entry by clicking on the number on the vertical gray bar next to the options and dragging it above or below the other entries.
- To remove a Social Media Entry, hover over the box you wish to delete, and click on the Minus symbol on the right side of the box and click Remove.
- You can follow the same steps for the Select Link buttons for myParish or Evangelus if you have a custom Post or Page on your site for them. If your organization does not use them, you can uncheck those boxes.
- Click the blue Update button in the top-right of Theme Settings to save your changes.
Header Settings
Images
Header Logo
This is the logo that is used in the left-side of the header bar (the one with the menu) when you first land on a page or scroll to the very top of a page.
Favicon
This is subject to the site’s editing history which will affect the efficacy of this field. This field is used to change the favicon image which is shown next to the page title in the browser tab and also shown when someone bookmarks a site page. If this field does not change the favicon in the browser tab, please contact Diocesan to change it.
Default Featured Image
The default featured image is used on any page that does not have a featured image set for it. It is also used as the header image for Post Archives (All News) and an individual post. Ideally, this would be a high-resolution aesthetic image of the organization or possibly landscape scene near your location.
CTAs (Call To Action buttons)
Show CTAs?
Click the Checkbox if you want to enable the CTA Buttons (max of 3)
These should be for links to very important links, e.g. Mass Times, Contact Us, and Donate.
- Click the Select Link button
- Insert the URL that you’d like the button to go to and the Link Text will be the Link’s Title
- If the URL is going offsite (e.g. USCCB), check the Open link in a new tab box
- You can also search existing content or scroll through your existing pages, posts, etc. and click one of those to add the Title as the Link Text (you can edit it) and automatically populate the URL.
- Click the Add Link button once everything is set.
- You can rearrange the CTAs by clicking on the number on the vertical gray bar next to the options and dragging it above or below the other buttons.
- To remove a CTA, hover over the box you wish to delete, and click on the Minus symbol on the right side of the box and click Remove.
Click the blue Update button in the top-right corner of the Theme Settings to save changes.
Footer Settings
Contact Info
Footer Logo
This field is optional. You can upload a photo to add to your footer. This will add the logo in the top-left of the footer above the social media.
Footer Button
This is optional. You can add a button to add underneath the Contact Info section information. Adding this is like adding a link elsewhere and the Link Text will be the button text. It is customary for this button to be a link to the Contact Us page, but it does not have to be.
Address Format
If you would like to change the layout of the Address in the Footer, you can do so here for the spaces/line breaks to take effect in the Footer’s Contact Info section
Engagement
The Engagement section will take the middle place of the footer if there is any content here.
Title
This will show the same way that the “Find Us” title shows up but will be to the left of the Find Us title.
Diocesan will help you set this up. Please contact us if you need any help with this.
Quick Links
There is a max of 8 quick links.
These should be used for any pages/sites that you’d like to be accessible from every page on your website. They could go to your privacy policy, contact us, offsite links that you’d like to include, e.g., USCCB, Vatican, Daily Reading, etc.
- Click the Select Link button
- Insert the URL that you’d like the button to go to and the Link Text will be the Link’s Title
- If the URL is going offsite (e.g. USCCB), check the Open link in a new tab box
- You can also search existing content or scroll through your existing pages, posts, etc. and click one of those to add the Title as the Link Text (you can edit it) and automatically populate the URL.
- Click the Add Link button once everything is set.
- You can rearrange the Quick Links by clicking on the number on the vertical gray bar next to the options and dragging it above or below the other links.
- To remove a Quick Link, hover over the box you wish to delete, and click on the Minus symbol on the right side of the box and click Remove.
Click the blue Update button in the top-right corner of the Theme Settings to save changes.