
Alphonsus Homepage How To
Homepage Groups
Remember to click the blue Update ![]() button in the top-right to save your changes.
button in the top-right to save your changes.
Hero
You can switch between Image or Video with the Toggle![]() . The Hero Overlay will add a filter over the Image Slider or Video to make the text more readable. The heavier the overlay, the darker the filter.
. The Hero Overlay will add a filter over the Image Slider or Video to make the text more readable. The heavier the overlay, the darker the filter.
Image
The image option allows for the Hero to be just a single image or a slider (up to 4 images). Whether you choose one or multiple images, the instructions are relatively the same.
- First, you need a Slide Image, click the Add Image button.
- The Select Image window will pop up. In the top-left, you can switch between Upload files and Media Library, which has all previous images uploaded to site).
- Once you select your desired image, click the Select button in the bottom-right corner.
- If so desired, you can add a Slide Title, but please keep it pretty short.
- If so desired, you can add Slide Text, but please keep it short, but can be longer than the title.
- If so desired, you can add a Slide Button for the user to click on to read more or go to a desired URL.
- Click the Select Link button and the Insert/edit Link window will pop up. Add the URL where you’d like the button to go and the Link Text will be the Button’s text.
- If the URL is going offsite (if the destination link has a different menu than your site’s) then it is best to check the Open link in a new tab box
- You can also search for content on your site and have the URL and Link Text generated for that Post/Page.
- To add more images, click the Add Slide button and repeat these steps.
- You can rearrange the Slides by clicking on the number on the vertical gray bar next to the options and dragging it above or below the other slides.
- To remove a slide, hover over the slide you wish to delete, and click on the Minus symbol
 on the right side of the slide and click Remove.
Video
The Video option for the Hero allows for it to play a video that you upload to the website. It is recommended that the video be no larger than 12-15MB and no longer than 30-40 seconds in length. Here are instructions for the Video Hero.
- Switch the Toggle to Video
- Add a webm or mp4 format video file.
- Click the Add File button
- The Select File window will pop up. In the top-right, you can switch between Upload files and Media Library (has all previous files uploaded to site).
- Once you select your desired video, click the Select button in the bottom-right corner.
- Loading Image (Optional) Add an Image to be a placeholder until the video is loaded on the site. It is optimal to take a screenshot of the first frame of the video.’
- Click the Add Image button
- The Select Image window will pop up. In the top-right, you can switch between Upload files and Media Library (has all previous images uploaded to site).
- Once you select your desired image, click the Select button in the bottom-right corner.
- If so desired, you can add a Title, but please keep it pretty short.
- If so desired, you can add Slide Text, but please keep it short, but can be longer than the title.
- If so desired, you can add a Button for the user to click on to read more or go to a desired URL.
- Click the Select Link button and the Insert/edit Link window will pop up. Add the URL where you’d like the button to go and the Link Text will be the Button’s text.
- If the URL is going offsite (if the destination link has a different menu than your site’s) then it is best to check the Open link in a new tab box
- You can also search for content on your site and have the URL and Link Text generated for that Post/Page.
Colorful Tiles
These tiles are just below the Hero of the Homepage. There is a minimum of 2 tiles and a max of 4. They can go to Pages, Posts, other sites, PDFs, etc.
Instructions
The colorful tiles are meant to be links to things that your visitors should have quick access to, things that are searched for most often on your site should be within these tiles. E.g., Bulletins, Mass Times for Parishes and Schedule a Tour, Contact Us, Parent Portal for Schools. Instructions for use are below.
- Icon (optional) You can leave this blank or search through the list of icons (you can type keywords to help find them).
- To remove an icon, click the smaller ‘x’ near the dropdown arrow.
- Click the Select Link button and the Insert/edit Link window will pop up. Add the URL where you’d like the button to go and the Link Text will be the Tile’s text.
- If the URL is going offsite (if the destination link has a different menu than your site’s) then it is best to check the Open link in a new tab box
- You can also search for content on your site and have the URL and Link Text generated for that Post/Page
- Provide a short description of the tile or where it is meant to go.
- To add more tiles, click the Add Tile button and repeat these steps.
- You can rearrange the Tiles by clicking on the number on the vertical gray bar next to the options and dragging it above or below the other tiles.
- To remove a tile, hover over the tile you wish to delete, and click on the Minus symbol on the right side of the tile and click Remove.
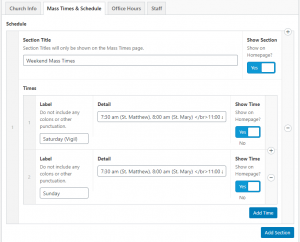
Mass Times
Instructions
- You can change the Title of this section
- You can add a Subtitle for this section too, which will go to the left of the View Full Schedule link
- You can also add up to two buttons (i.e. Livestream Masses)
- Click the Select Link button and the Insert/edit Link window will pop up. Add the URL where you’d like the button to go and the Link Text will be the Tile’s text.
- If the URL is going offsite (if the destination link has a different menu than your site’s) then it is best to check the Open link in a new tab box
- You can also search for content on your site and have the URL and Link Text generated for that Post/Page
- Mass Times are set in the Theme Settings that can be found in the WordPress Menu and will show the Sections that are set to Show on Homepage and the Times that are set to Show on Homepage
Banner
The banner is a great place to put your mission or vision for your organization or some information about your organization to have visitors get familiar.
Instructions
- Enter the Title for the Banner Section. (Recommended to keep this short, max of a couple words)
- Set a Background image if so desired. This will be shown behind the Heading item and the overlay is based on your site’s colors.
- Click the Add Image button.
- The Select Image window will pop up. In the top-left, you can switch between Upload files and Media Library (has all previous images uploaded to site).
- Once you select your desired image, click the Select button in the bottom-right corner.
- You can also add up to two buttons (e.g. Contact Us, Our Mission)
- Click the Select Link button and the Insert/edit Link window will pop up. Add the URL where you’d like the button to go and the Link Text will be the Tile’s text.
- If the URL is going offsite (if the destination link has a different menu than your site’s) then it is best to check the Open link in a new tab box
- You can also search for content on your site and have the URL and Link Text generated for that Post/Page
- Parallax? This is if you want the image to scroll with the page or stay static (does not move when scrolling)
News
Instructions
The News on the Homepage displays posts from a certain category and displays a View All button that, by default, will go to the category archive page that contains all posts in that category.
- Type the Title for the News Section (short).
- Type the Subtitle for the News Section, this will display next to the View All link
- You can replace the category archive button by linking it to somewhere else using the Button option and using the Select Link button. There are not many cases where this should be used, as this is automatically set to category’s archive page.
- The Category is a radio button selector to choose a Post Category to display on the Homepage. Most of the time, this should be left to use either the News category, but you could change this to dedicated Homepage News category too, if desired.
Below is what each group affects on the frontend