How to Setup Form Notifications
An online form is a great way to get input and information about the people visiting your website and who are involved in your organization. Forms can be used for online parish registration, event registration, feedback for the website, questions, and even ministry sign-ups. This information does not help you unless you receive this information. You can do this through the Form’s Notifications.
Here is how to setup form notifications:
- Once logged in, click on Forms in the menu on the left-hand side of the Dashboard.

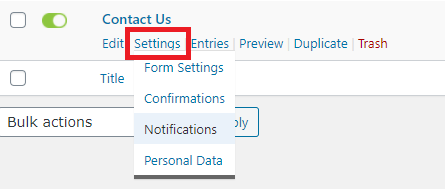
- Hover over the Form that you would like to change and then hover over the Settings option
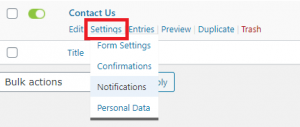
- Click Notifications
- Normally there will be just one Notification listed, Admin Notification
- Click the Admin Notification
- You will see several options, chief of which is the Send To email and the From Email (#2 & #4)
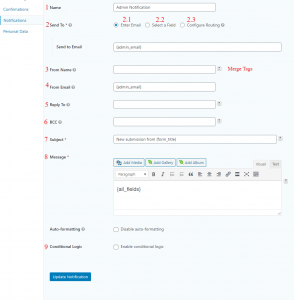
Note: The little box (Merge Tags) to the right of many of these options will let you add what the user inputted in the form.- Name- Name of the Notification in the list on the previous screen
- Send To- This is where the Notification email will be sent when the Form is submitted
- Enter Email- Used the majority of the time, input a single email in the Send to Email field below
- Select a Field- Will look for any Email fields in the form, so you could send a Notification to an email address the user provides
- Configure Routing- Will send to a specific email if a certain condition. E.g. send to DRE’s email if Ministry interested in is Faith Formation. You can have multiple conditions
- From Name- Who the email will be from when the email appears in the Send To Email’s mailbox
- From Email- The email that the Notification will claim it was sent from.
Note: Whenever possible this should match the domain of the Send To Email field’s email. Domain is the part after the ‘@’ in an email. E.g. @gmail.com - Reply To- if the recipient of the notification wishes to reply to the email whom would it go to
- BCC- if you wish to send the email to more than just the Send To’s Email, you can add these here separated by a comma and a space. E.g. “backup@email.com, secondbackup@email.com”
- Subject- Default will input the form’s title into it, but you could change this to make it more specific
- Message- Default will include all information the user inputted in the form, but you can format this however you’d like using the editor.
- Conditional Logic- You can set different conditions for the notification to send or not.
- Once everything is set, click the Update Notification button at the bottom of the screen